

Aquí estamos hoy con más una de nuestras colaboradoras, Lidia, que nos ha preparado un TUTORIAL para hacer una bolsa de cordón con ventana transparente! Para este proyecto hemos usado la tela de PERROS EN LA PLAYA y para la ventana el VINILO DE COSER. Es muy sencillo, ya verás, y perfecto para llevar todo bien organizado allá donde vayas. En especial si tienes peques… Y aquí vamos con el PASO A PASO y en un plis plas la tienes!
“A continuación os muestro cómo hacer una bolsa con ventana. Este tipo de bolsa, personalmente, me encanta, ya que los niños pueden ver que hay dentro guardado. Al ser verano, para la ocasión he cosido una bolsa con la tela de perritos playeros para guardar la crema, el cepillo, el bañador… pero en casa tenemos otras para guardar infinidad de cosas: en una guardamos las ceras, en otra los muñecos cuando nos vamos a comer fuera o al médico… Seguro que se te ocurren un montón de utilidades! No es difícil de hacer, pero tienes que seguir los pasos e indicaciones que a continuación te cuento.”
Apunta bien el MATERIAL QUE VAS A NECESITAR para que no te falte nada (mira las cantidades más abajo en las dimensiones de las piezas cortadas):
– tela algodón estampada (para exterior), en este caso hemos usado la de perritos playeros
– tela algodón lisa (para el interior)
– vinilo para coser
– 50 cm de cordel negro o de cinta spaguetti
– imperdible o pasacintas

Ahora corta todos los trozos de tela necesarios y sobretodo, muy importante, fíjate que en todos los ellos el dibujo esté siempre en vertical para que no tengas perritos patas arriba:
– 2 trozos de 24 x 20cm (uno de la tela exterior y uno de tela interior)
– 4 trozos de 6 x 10cm (dos de la tela exterior y dos de tela interior)
– 2 trozos de 24 x 8cm (uno de la tela exterior y uno de tela interior)
– 1 trozo de 15 x 10cm (tela de plástico transparente, vinilo para coser)
– 2 trozos de 35 x 24cm (uno de la tela exterior y uno de tela interior)
– 1 trozo de 5 x 42,5cm de tela exterior (por donde pasaremos el cordel)
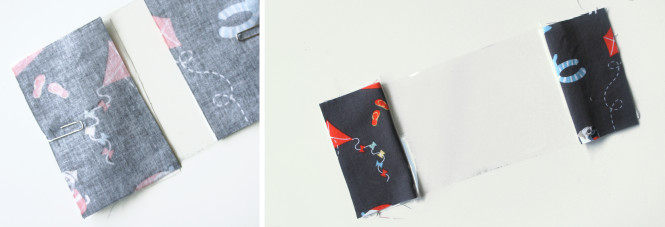
– Cogemos los 4 trozos de 6 x 10cm, y los cosemos como indica la foto. Para el plástico mejor no usar alfileres, sino clips o pinzas pequeñas. Si usas alfileres el vinilo quedará con los agujeritos y marcas. Cuando cosáis plástico si veis que se os engancha con la máquina y no corre, colocar papel de periódico o papel de horno debajo. O simplemente un poco de washi tape que cubra la parte de abajo del prensatelas.
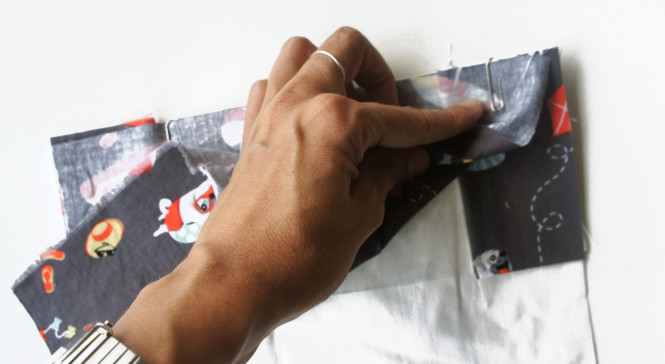
– Después cogemos los 2 trozos de 24 x 20cm y cosemos como sale en la foto. Fijaros que el dibujo quede en vertical a la hora de girarlo ( de hecho cuando colocáis la tela con los clips tendríais que ver el dibujo del revés)
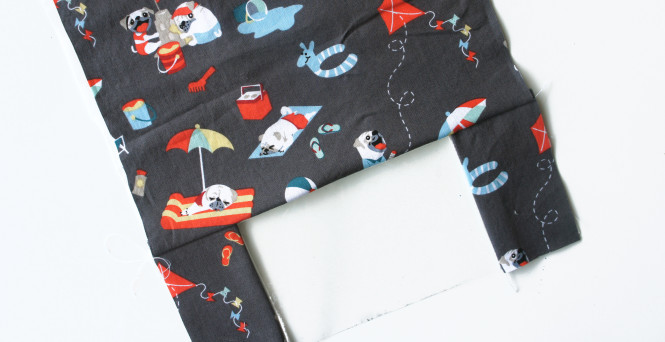
– A continuación cogemos los 2 trozos de 24 x 8cm y lo cosemos como enseño en la imagen abajo. Fijaros también sobretodo que el dibujo quede en vertical al girarlo. Cosemos alrededor de la ventana.
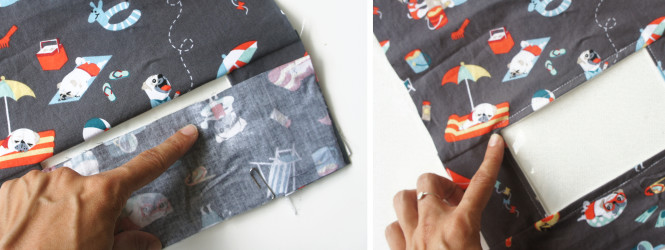
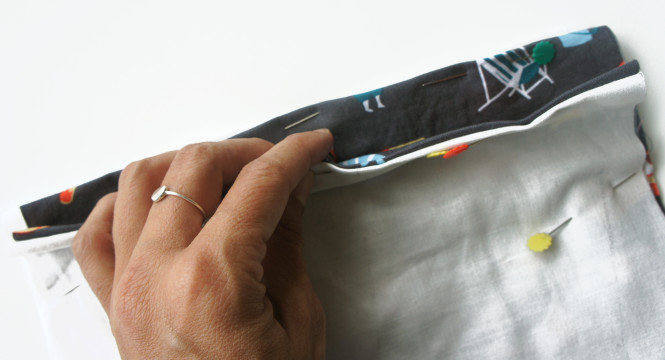
– Juntamos la tela interior con la tela exterior y hacemos un dobladillo de 1cm en la parte de arriba. Si queréis podéis embastar, yo lo hice directamente con agujas. Pero aún no cosemos. Cuando ya tenemos el dobladillo marcado con agujas (tanto de la parte delantera como trasera) , juntamos bonito con bonito de la tela exterior, de manera que veamos la tela interior.
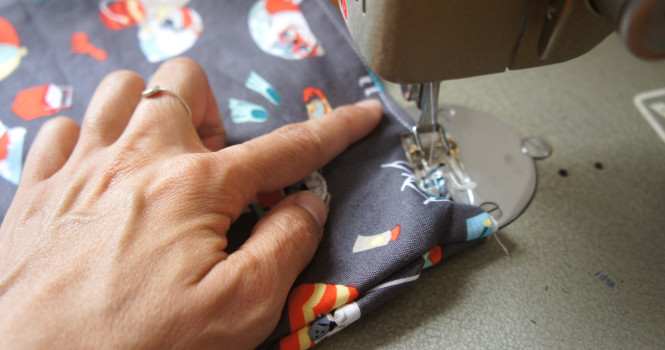
– Cosemos en U por los laterales y la parte de abajo. Sobretodo aún no cosáis la parte de arriba, sino quedaría la bolsa cerrada! Por el mismo sitio donde has cosido haz un zig zag apretadico para que no deshilache. Cuando ya tengamos las dos partes unidas, es hora de coser el dobladillo que previamente habíamos marcado con agujas. Si tu máquina te lo permite, saca la parte para poder coser en circular (la mía es antigua y no me lo deja hacer)
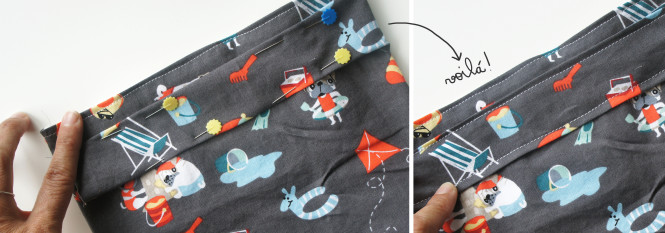
– Luego cogemos el trozo de 5 x 42,5cm y lo colocamos a 2cm de la parte de arriba de la bolsa. Se puede embastar o como he hecho yo, sujetarlo con agujas haciendo ya el dobladillo. Hace el dobladillo también en los extremos para que quede más pulido. Cosemos el trozo de 5 x 42,5cm como podéis ver en la foto. Si tu máquina te lo permite, vuelve a sacar la parte para poder coser en circular.
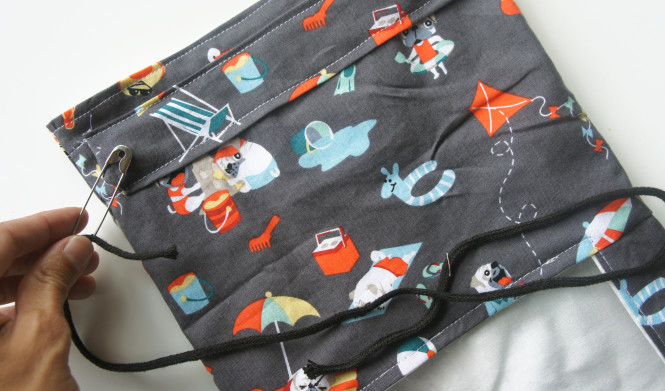
– Con la ayuda de un imperdible o pasacintas pasamos el cordel por dentro del trozo de tela que hemos cosido. También puedes usar cinta spaguetti! Da un nudo en cada punta.
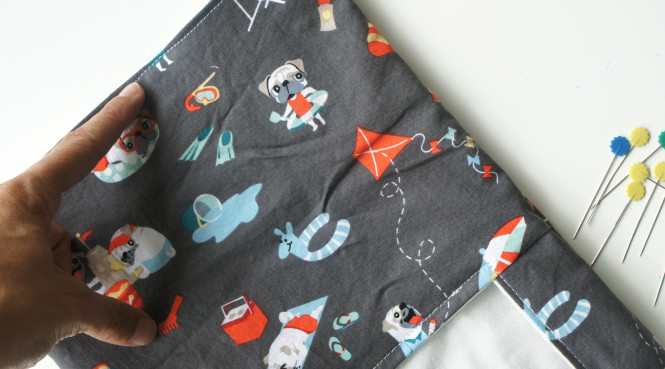
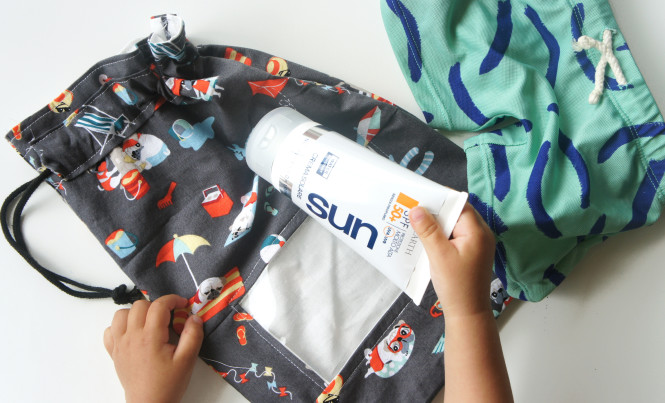
Una vez pasado el cordel, la bolsa ya se puede dar por terminada! Mira que mona queda y que sencillo ha sido hacerla, verdad? Y las miles de combinaciones que puedes hacer, porque en este caso hemos usado la misma tela en todas las partes pero puedes usar una tela diferente, a juego con la principal, para el trozo por donde pasa el cordel y/o también para los trozos que hacen las laterales de la ventana!
¿Te animas a hacerla? Hay un montón de TELAS DE ALGODÓN ESTAMPADAS y también BÁSICAS en la shop y estamos deseando ver que haces con ellas. Además, si te falta la inspiración y no sabes muy bien que combinaciones usar, date un paseo por nuestra sección de PACKS ESPECIALES. Y ya sabes… nos haría mucha ilusión ver este y otros proyectos costuriles tuyos! Si cuelgas una foto, usa el hashtag #ilovekutchishop y así te podremos encontrar.
*Todas las fotos de este post están hechas por Lidia Fraguas.
![]()
Here we are today with our partner Lidia, who has prepared a TUTORIAL to make a drawstring pouch with transparent window! For this project we used the fabric DOGS ON THE BEACH and for the window the SEWING VINYL. It’s simple, you’ll see, and perfect to carry all and well organized wherever you go. Especially if you have kids… And here we go with the STEP BY STEP instructions!
Aim the MATERIAL THAT YOU WILL NEED so you don’t miss anything (see below in the dimensions of the cuted pieces to check the amount needed):
– printed cotton fabric (exterior), in this case we used the dogs on the beach
– cotton fabric (for interior)
– sewing vinyl
– 50 cm of black string or spaguetti ribbon
– safety pin or bodkin needles
Now cut all the pieces of fabric necessary and above all, very important, notice that all of them are always with the drawing in vertical so you don’t have paws up:
– 2 pieces of 24 x 20cm (one exterior and one interior fabric)
– 4 pieces of 6 x 10cm (two of the exterior fabric and two interior fabric)
– 2 pieces of 24 x 8cm (one exterior and one interior fabric)
– 1 piece of 15 x 10cm (sewing vinyl fabric)
– 2 pieces of 35 x 24cm (one exterior and one interior fabric)
– 1 piece of 5 × 42,5cm exterior fabric (where to pass the string)
– Grab the 4 pieces of 6 x 10cm, and sew as shown in the picture. It’s best not to use regular pins, instead use clips or small pliers. If you use pins in vinyl it will remain with the holes and marks. When you sew plastic, if you see that engages the machine and does not run, place newsprint paper or parchment paper underneath. Or just a little washi tape covering the bottom of the foot.
– Now take the 2 pieces of 24 x 20cm and sew as in the photo. Notice that the drawing is vertical when turning the fabric (in fact when you place the fabric with clips you should see the picture upside down)
– Next are the 2 pieces of 24 x 8cm and sew as showed in the image below. Again, bae aware if the drawing is vertical to rotate it. Sew around the window.
– Collected the fabric inside the outer fabric and make a 1 cm hem at the top. If you want you can baste, I did it directly with needles. But don’t sew them yet! When the hem is ready (back and front sides), face both exterior fabrics together. You’ll now see only the interior fabric.
– Sew in U shape, both sides and bottom. Do not sew the top, otherwise you would close your bag! When you have the two parts together, it is time to sew the hem that you’ve previously marked with needles. If your machine allows, take the part to sew in circular.
– Then take the piece of 5 x 42,5cm and place in 2cm of the top of the bag. You can baste or as I have done, place with needles making an hem. Do it also at the ends so that it looks polished. We sew the piece of 5 x 42,5cm as you can see in the photo. If your machine allows again, take the part to sew in circular.
– With the help of a safety pin or bodkin needles we pass the string inside the piece of fabric that we have sewn. You can also use spaghetti ribbon! Give a knot on both edges.
Once you pass the string, the bag is finished! Look how cute it is, and simple to do, right? And the thousands of combinations you can do, because in this case we used the same fabric on all sides but you can use a different fabric, matching the main fabric, for the piece through which you pass the cord or for the pieces that make the sides of the window!
Do you dare to do it? There are lots of PRINTED COTTON and BASIC fabric in the shop and we’re looking forward to see what you do with them. Also, if you need inspiration to make combinations, take a look through our section SPECIAL PACKS. And you know… it would make us very excited to see this and other sewing projects! If you make a picture, use the hashtag #ilovekutchishop so we can find you.
*All photos in this post are made by Lidia Fraguas.


1 comentario en «TUTORIAL bolsa con ventana»