TUTORIAL bolsa de picnic o playa!
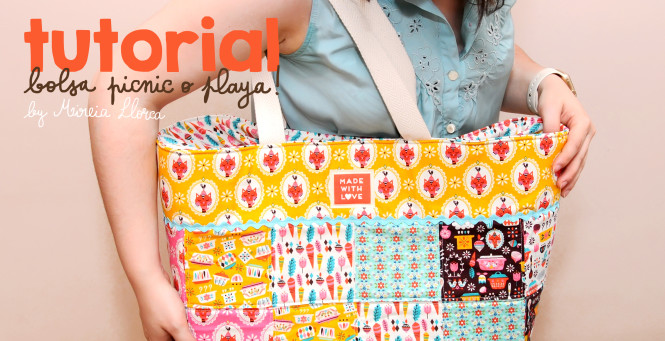
Yo ya le estoy pillando gustillo a esto de los viernes con nuestras super colaboradoras! ¿y tu? Hoy es la vez de Mireia que nos trae un TUTORIAL para hacer una bolsa tipo playera o de picnic al puro estilo patchwork. Una pasada de bonita y usando las telas de la colección VINTAGE KITCHEN y también detallitos como el MADE WITH LOVE de nuestra tela de etiquetas de costura. Ideal para recortar y coser en proyectos costuriles.
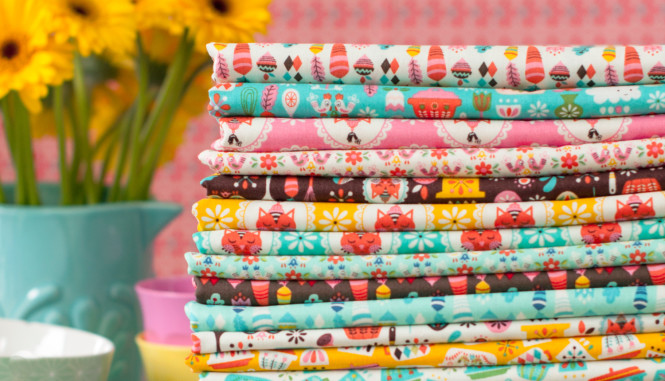
1. imagen de la colección VINTAGE KITCHEN| JOLIJOU |
Diseñados por Andrea, más conocida por JOLIJOU, los estampados VINTAGE KITCHEN son de lo más divertido y colorido, con una escala pequeña y perfecta para trabajar en patchwork. Y dicho esto, vamos allá para el TUTORIAL PASO A PASO! Apunta bien el material que vas a necesitar:
– retales de telas varios, en este caso se ha usado telas de la colección VINTAGE KITCHEN
– 0,60m para la tela interior del forro
– 0,60m guata estable para quedar más resistente
– 1,20m cinta espiga para las asas
– 1,20m cinta ondulina de un color coordinado con las telas
– cierre magnético (opcional!)
– cordel o cinta spaguetti
– De las telas estampadas cortamos 48 cuadrados de 11 x 11cm. En este caso, hemos utilizado 6 estampados distintos pero podemos utilizar los que queramos! Es una buena labor para utilizar todos esos trozos de telas kutchis que nos van sobrando!
– Organizamos los retales como más nos gusten en dos cuadrículas de 6 por 4 (ver esquema 1)
– Vamos cosiendo los retales, primero por filas y finalmente por columnas. El resultado final tienen que ser dos cuadriculas de 60 x 40cm aproximadamente. Esta medida variará un poco en función de la distancia o margen de costura que uses en tu máquina.
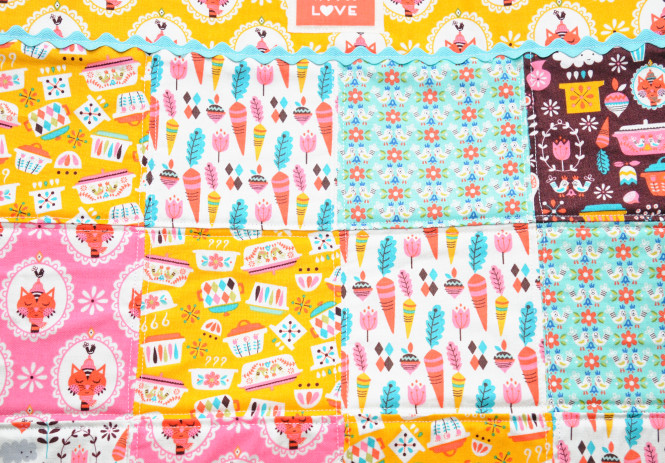
– Seguidamente coseremos la tira superior a la cuadrícula que hemos realizado en el anterior paso. Para ello, tenemos que cortar un trozo de 11cm de alto por el ancho resultante de la pieza anterior (aproximadamente 60cm). Haremos lo mismo con la otra pieza restante. (ver esquema 1)
– Con esprai temporal amovible pegaremos los dos bloques a una capa de guata y lo acolcharemos a nuestro gusto. Podemos realizar dos pespuntes rectos, uno a cada lado de las costura, como ha sido este caso.

2. cuadricula de 6 por 4, cosida a la tIra superior y después con colocación de ondulina| ESQUEMA 1 |
– Coseremos una ondulina decorativa en cima de la costura que une la tira de arriba con la cuadricula para darle un aire más bonito y recortaremos todo el sobrante. Lo haremos en las dos piezas que serán luego el frente y trasera de nuestra bolsa. (ver esquema 1)
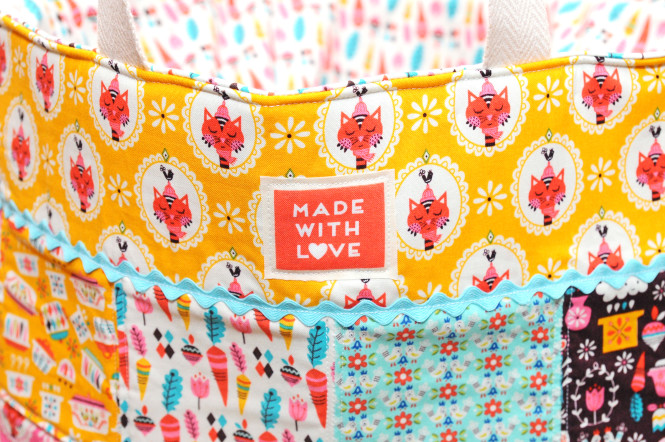
Una vez tenemos las dos telas exteriores listas vamos a empezar a preparar las interiores (forro):
– Cortaremos la tela del forro en dos cuadrados de la misma medida que hayan quedado los 2 bloques exteriores.
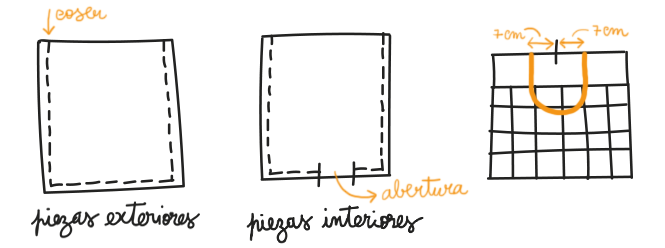
3. costura de las piezas exteriores, interiores y colocación de asas| ESQUEMA 2 |
– Encararemos derecho con derecho (cara buena con cara buena) los dos cuadrados exteriores y derecho con derecho los dos cuadrados del forro, que coincidan bien. Coseremos un pespunte en forma de U tal y como indicamos en la imagen (ver esquema 2). Usa alfileres o pinzas de costura para sujetar las piezas.
– Una vez cosido haremos las pinzas. Para ello, en las 4 esquinas dibujaremos un cuadrado de 8 x 8cm desde la costura. Cortaremos por la linea dibujada, abriremos la pinza uniendo costura con costura, bien alineada, y coseremos en recto! En este paso es muy importante que las 4 esquinas sean iguales para que nuestro bolso no quede desnivelado (ver esquema 3)
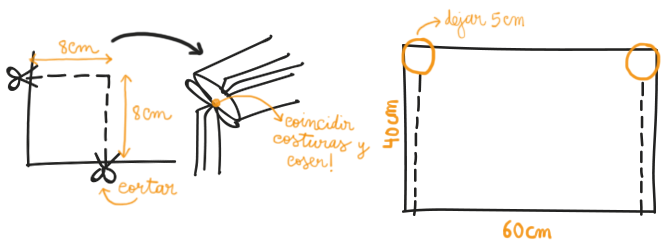
4. coser las esquinas y la pieza de cierre de la bolsa| ESQUEMA 3 |
– Giraremos el bolso exterior y dejaremos el interior (forro) sin girar.
– Es hora de poner las asas! Cortaremos 2 tiras de 60cm de cinta de espiga. Marcaremos el centro del bolso exterior y colocaremos las asas mirando hacia abajo a 7cm del centro cada una de las puntas de la cinta de espiga. (ver esquema 2).
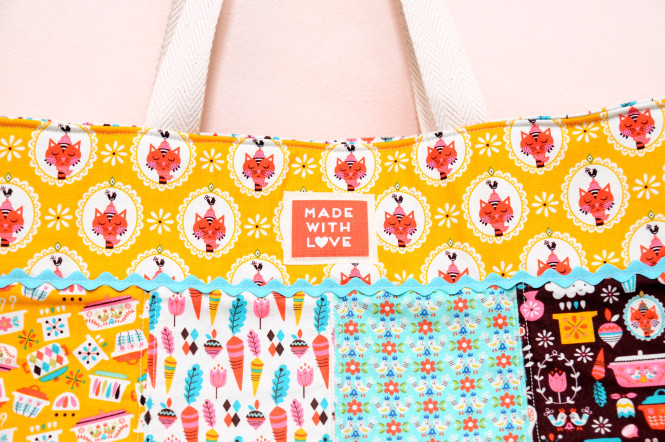
– Seguidamente pondremos la pieza que va a corresponder al cierre de arriba del bolso que funciona con cordel. Para ello, cortaremos dos trozos de tela de 60 x 40cm. Encararemos derecho con derecho y coseremos los dos laterales dejando una obertura sin coser de unos 5cm a cada lado. (ver esquema 3). Le haremos un dobladillo en el extremo que hemos dejado sin coser para que pueda pasar fácilmente el cordel. Coseremos toda la circunferencia y daremos la vuelta a la labor. Encararemos esta pieza con el derecho (cara buena) de la parte exterior del bolso.
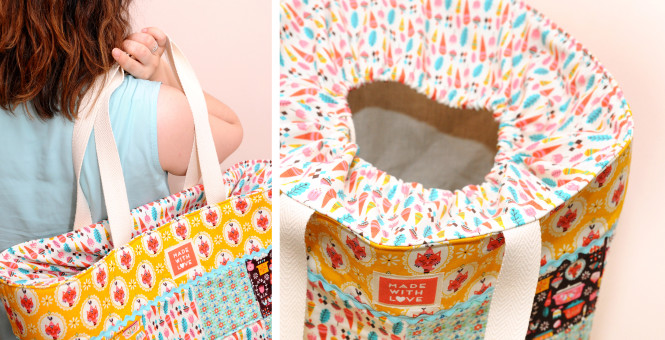
– Meteremos el bolso exterior dentro del forro, cara bonita con cara bonita, y coseremos un pespunte en toda la boca del bolso. Una vez realizado el pespunte, sacaremos el bolso exterior por la apertura que hemos dejado en el forro. Coseremos esta obertura con un pespunte invisible que podrás realizar fácilmente a mano.
– Colocaremos el cordel en la pieza del cierre para facilitar la obertura y coseremos un pespunte en la parte superior de la bolsa para que esta quede más sujeta. Opcionalmente podemos añadir un cierre magnético.
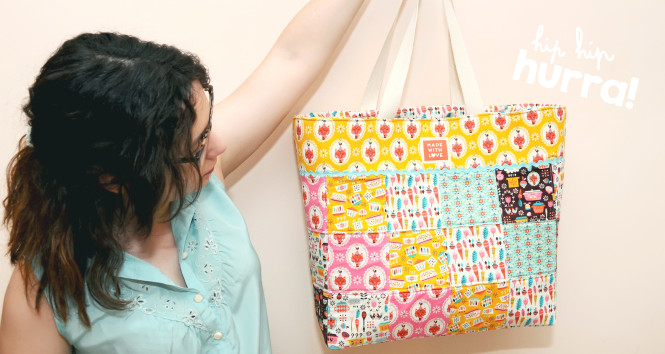
Y colorin colorado este tutorial se ha acabado! Y ya sabes… Si te animas a hacerla nos haría mucha ilusión ver este y otros proyectos costuriles tuyos! Si cuelgas una foto, usa el hashtag #ilovekutchishop y así te podremos encontrar.
*Todas las fotos de este post están hechas por Mireia Llorca.
![]()
I’m already getting the taste of this Fridays with our super collaborators! And you? Today it’s Mireia’s turn to bring us a picnic or beach bag TUTORIAL in patchwork style. Cracking pretty and using fabrics from VINTAGE KITCHEN collection and trifles like MADE WITH LOVE from our sewing fabric labels. Ideal for cutting and sewing in these kind of projects and also on quilts. Designed by Andrea, best known for JOLIJOU, VINTAGE KITCHEN prints are the most fun and colorful, with a small and perfect scale for working on patchwork. Let’s start our STEP BY STEP TUTORIAL! Aim the material you will need:
– scraps of various fabrics, in this case it has been used fabrics from VINTAGE KITCHEN collection
– 0,60m for inner lining fabric
– 0,60m stable batt to be more resistant
– 1,20m twill ribbon for handles
– 1,20m zigzag ribbon in a coordinated color
– magnetic lock (optional!)
– string or spaguetti ribbon
– From the patterned fabrics cut 48 squares of 11 x 11cm. In this case, we used 6 different prints but you can use whatever you want! It is a good oportunity to use all these pieces of fabric that are overrunning!
– Organize the squares as you like in two grids of 6 by 4 (see diagram 1)
– Start sewing the squares, first by rows and finally by columns. The end result must be two pieces of 60 x 40cm approximately. This measure will vary depending on the distance or seam allowance you used on your sewing machine.
– Then sew the top strip to the grid that we have made in the previous step. To do this, we need to cut a piece of 11cm high by the width resulting from the previous part (approximately 60cm). We do the same with the other remaining piece. (See diagram 1)
– With removable spray you’ll stick the two blocks to a layer of wadding and upholster as you like. You can do two straight stitching, one on each side of the seam, as we did.
– Sew a decorative zigzag ribbon on top of the seam joining the strip with the grid to give it a nice air and will cut all the excess. Do it in the two pieces that will then be the front and back of our bag. (See diagram 1)
Once we have the two outer fabrics lists we will start preparing the interior (lining):
– Will cut the lining fabric into two squares of the same as they have been the two outer blocks.
– Face right sides (good face with a good face) the two outer squares and also the right sides of the two lining squares, matching well. Sew topstitching U-shaped as indicated in the image (see diagram 2). Use sewing pins or clamps to hold the pieces.
– Time to sew the tweezers. To do this, in the 4 corners (2 outside and 2 inside) we draw a square of 8 x 8cm. Cut off by the line drawn, we will open the clamp joining seam welded, well aligned and sew! This step is very important that the 4 corners are equal so our bag does not become uneven (see diagram 3)
– Turn the bag outside and leave the inside (lining) without turning.
– It’s time to put the handles! Cut 2 strips of twill ribbon of 60cm. Mark the center of the outer bag and place the handles looking down with 7cm from the center to each side. (See diagram 2).
– Then put the piece that will correspond to close up the bag that works with string. To do this, cut two pieces of fabric 60 x 40cm. We will face right sides together and sew the two sides leaving an opening unstitched about 5cm on each side. (See diagram 3). We will make a hem at the end we have left unstitched so you can easily pass the string. We sew entire circumference and give back to the work. We will face this piece right (good side) of the outside of the bag.
– Put the bag inside lining outside, pretty face with pretty face and sew and stitch across the opening of the bag. Once you do the stitching, drag the outer bag through the opening we have left in the lining. Sew this overture with blindstitch that can easily be done by hand.
– Put the string on the part of the closure to facilitate opening and sew a stitch at the top of the bag so that this amount is more subject. Optionally we can add a magnetic closure. And this tutorial is over!
* All photos in this post are made by Mireia Llorca.

Mega fan de gominolas, apasionada de los patterns, colorines y del mundo costuril… culpa de mi abuela. Voy siempre de bufanda o scarf, no importa si hace frio o calor y mi más reciente hallazgo es que no puedo vivir sin humus y sushi. Ahora soy un poco más ciega que antes.. cosas de la edad!
ILOVEKUTCHI es una marca registrada! Todos los derechos reservados


5 comentarios en «TUTORIAL bolsa de picnic o playa!»
Hola
estan mal las medidas en los materiales. Donde pone cm (1.20cm por ejemplo) debería poner metros (1.20 m, 0.60m…) a no ser que cosamos un bolso miniatura 🙂
Toda la razón Julia!! Ya está actualizado. Mil gracias por avisarnos ^^
Una bolsa muy bonita !!! Deseando que lleguen las vacaciones para intentar igualar a Mireia en la confección de la bolsa de playa.
Felicidades por estos tutoriales tan bien explicados !!
Una bossa molt alegre, fàcil de fer i molt ben explicat el tutorial, bones idees per fer aquest estiu.
Felicitats per la feina ben feta!!
Leo